


Pixel Art is Rough!
It’s been a little more than a month since I originally started working on the background for our first stage, and after spending time on other areas, I’m revisiting it and now trying to get it done for realsies. Pixel art is actually pretty tricky (or at least I find it pretty tricky) and working on a large background like this has resulted in me learning a lot of stuff.
Working with a limited colour palette is something that I’m not used to, and it has some things that you really need to be aware of during the process:
- You need to have a very nice palette figured out that will help pull different elements together, and have just the right amount of contrast
- Working with .png files allows you to have indexed colors. These look much nicer than other formats, and allow you to have relatively small images compared to something like a .jpg
- Photoshop has lots of anti-aliasing features. These are great when working with traditional art and photos… but they are chaos when trying to do pixel art. You have to really be aware of this if you want to avoid accidentally introducing colours into your image
- Dithering is your friend
Being ever so slightly colour blind… colour selection has never been my strong point, and being very new to this technique of image creation… well you can bet that the process is going slow for me. I’ve gone through a few different palettes, and even took the background quite far using one that I thought would work… but in the end it just wasn’t working for me and I decided that between the colours I’d chosen and the material I was trying to paint… I needed to just cut my losses and start over. This meant replacing my sandy look with a more dark, clay type of look. I have sped up drastically since starting, but it’s still all very new, and not second nature to me yet.
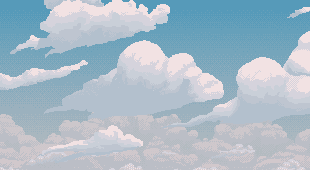
It took me a long time to find all the anti-aliasing options I need to turn off, and I’m still not sure that I’ve got everything tweaked as much as I’d like. Gradients for example seem hard to get as I can’t seem to limit the number of colours that the gradient tool will use. You can see my use of dithering in the overall sky gradient, and in the clouds… but while I can apply a dithering texture to the brushes while painting things like clouds, the only way I’ve figured out how to do a gradient is to do the gradient on a layer, copy it to a new image, limit the number of indexed colours, and then copy it back to the original file. That can’t be the most efficient way of doing it.
Anyways, you’ll see below a video of me painting. I’ve sped the footage up 30x, so that’s actually a little more than 5 hours of actual painting time. I hadn’t thought of recording my process until I was already partially though, so unfortunately you miss me blundering through a lot of the process. I was pretty confident in how it was coming out, but knew that it could still be brought up a notch and so after searching around the internet came across a fantastic forum called Pixelation, where I was able to ask for a critique. I’m now in the process of refining the painting, so hopefully I can get it finished soon.
Sped up footage of me painting the bg for our Alberta Oil Sands level. Be sure to view at 1080p in full screen!